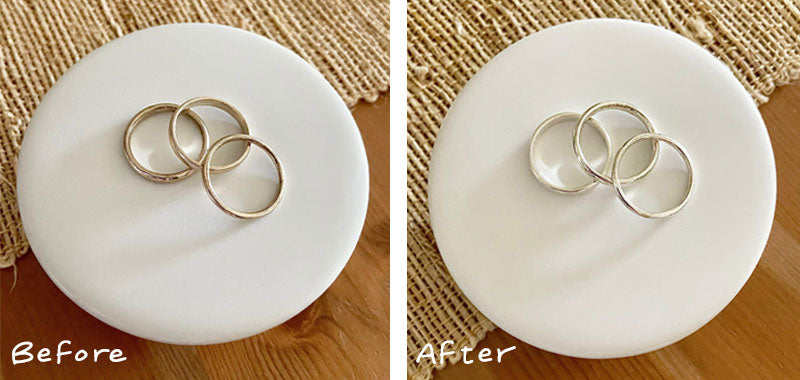
A simple step-by-step guide to cleaning your silver jewelry with everyday household items

Tarnish, ugh. The culprit behind dull and discolored silver jewelry + many frowny faces, but did you know it's just a simple reaction between silver and sulfur in the air?
Silver + Sulfur → Silver Sulfide
When you put tarnished jewelry into an aluminum foil bowl and add baking soda + boiling water you trigger an electrochemical reaction between the silver sulfide and aluminum.
Silver Sulfide + Aluminum → Silver + Aluminum Sulfide
The baking soda enables the flow of electrons that transfers sulfur to the aluminum. What you're left with is sparkly clean silver. Yay, science!

The best way to prevent the formation of silver sulfide on the surface of your fine or sterling jewelry is to store it in an air-tight container when you're not wearing it. By limiting exposure to the air, you're preventing the reaction with sulfur.
Once the damage has been done though, the aluminum foil + baking soda + boiling water method outlined below is a wonderfully simple solution. It also works great on solid gold jewelry.
Although solid gold doesn't tarnish like silver, depending on the alloy mix (ex. 10k gold) this may help revive your solid gold jewelry.
I don't suggest doing this with plated or brass jewelry. Best of luck if you try. Let me know what happens!
WARNING!
This is best done with jewelry that does not have stones. It is a very very BAD idea to submerge gemstones in cleaning solutions that aren't specifically made for them. It can cause serious damage and discoloration.
From my personal experience, diamonds are able to withstand this cleaning method, but that's because diamonds are literally the hardest material on the planet.
Clean silver and gold separately. Oh, and don't put a metal spoon or any kind of metal utensil into the baking soda bath! The reaction already involves two metals—don't add a third and eff things up. 🙃
What you need
✓ Bowl
✓ Aluminum Foil
✓ Baking Soda (not baking powder)
✓ Boiling Water
✓ Non-Metal Utensil (ex. popsicle stick, chopstick)
✓ Tarnished Jewelry
Tips
🌟 I only do a few pieces at a time in a small bowl. Technically, the jewelry doesn't need to be touching the aluminum foil for the reaction to work, but it makes me feel better when they do.
🌟 This cleaning solution is non-toxic and is OK to dump down the drain when you're done. It's also fine to rinse and save the used aluminum foil for your next cleaning session.
🌟 If you don't get the results you want the first time around, go ahead and do the whole routine again. Some argue this cleaning method can make metal porous with every application, but I have yet to experience jewelry damage. Having said that though, tarnish prevention through proper storage requires less effort and is the best action you can take.
Steps
1. Gather everything you need and line a bowl with aluminum foil.

2. Place your jewelry in the bowl, making sure every piece is touching the aluminum foil (if you're oddly superstitious like me).

3. Sprinkle baking soda directly on the jewelry.

4. Add enough boiling water to cover the jewelry completely. Let the reaction bubble for 30-45 seconds. Then flip the jewelry with a non-metal utensil so the other side touches the aluminum foil. Wait another 30-45 seconds. If the tarnish is being stubborn, feel free to move the jewelry around or flip it a few more times.

5. Remove your jewelry from the bowl with a non-metal utensil. Rinse jewelry to remove any lingering baking soda and pat dry with a towel. If you're not happy with the result, run through the process again.
6. Enjoy your clean jewelry or store it somewhere safe from sulfur exposure!


